
Any Blender artist who creates or intends to create animated films that leverage all that the Cycles engine has to offer will have, at some point, after jumping all the various hurdles that come with producing animated characters against an elaborate backdrop replete with props, all painstakingly textured and enhanced with complex lighting and dynamic camera movement, sent their scenes to an online render farm and been unpleasantly surprised by the frames they got back.
We often associate sending projects off to render as the shiny ribbon at the end of a marathon of problem solving, optimising, questioning the purpose of our thankless existence, etcetera, but really it’s more like the penultimate waypoint of the journey, meant to tell us “you’re almost there, but don’t get cocky because I’ve got a few surprises left for you, pal!”
Over at our render farm, we’ve investigated and learned from quite a few problematic Blender renders, and are happy to report that the majority of the issues are a result of a little oversight, which is completely understandable at the last sprint of a project, with the deadline looming and the celebratory wrap up beers calling one’s name, which is why we’ve rounded up a list of things to check to avoid some of the common aforementioned nasty surprises that can be encountered after rendering a Blender project on a render farm service, for reference during the final leg of your 3D animation.
Are you tired of dealing with the headaches of rendering your Blender scenes on your own? Look no further than GarageFarm.NET. Our Blender render farm is dedicated to supporting Blender artists like you, with extensive compatibility for the Cycles engine and all its features. And if you do run into any issues, our live support team is available 24/7 to assist you.
If you assemble your render passes or add effects inside of Blender’s Compositor, it’s possible you may have been working on your node chain and at some point forgotten to plug the end of the final chain to the composite node.
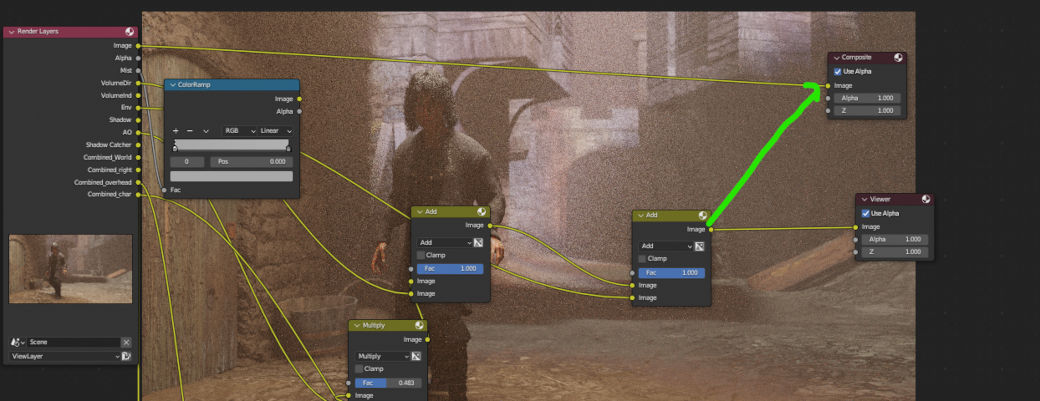
The composite node is what makes it to the final frame, and even if you are aware of this, it can be easy to overlook!
When working on a problematic area in a scene, it makes perfect sense to isolate that region in the viewport so we can make our changes and have the area of concern updated more quickly, but make sure to untick the render region box if you intend to have the whole frame rendered.

Likewise, in an attempt to expedite the refinement process in a project, the “simplify” option might have been enabled and left that way, which wouldn’t be much of a problem if the “render” values were untouched, but it may be the case that subdivision levels or child particles were reduced to crank out faster render tests, so it pays to make to untick “simplify” before sending off a project as a rule of thumb.

As a render farm service, we encourage extensive testing, especially for animation. Rendering a few frames out of a sequence in a lower resolution is good practice, but it’s important to make sure the final resolution is set before sending out a project.

If you use the percentage field to change your resolution, it’s possible that some render farms may display the values set in the x and y fields, but will render the values after the percentage override is applied, so triple check just in case!
The Denoiser is a boon to every 3D artist, don’t get us wrong! We remember the days of clunky hacks to get away with fewer samples, and we don’t think of them fondly. But, when time is no longer an issue (as is the case when using a rendering farm) you may want to render your frames in their full sampled, unfiltered glory!

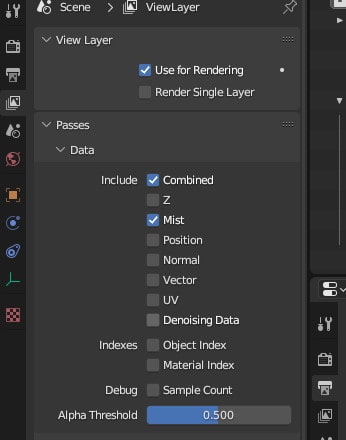
Be sure to check the tickbox in the render settings, and in case you’ve enabled Denoising Data in the render passes tab, double check your compositor node chain!

It should be pointed out that the modern online render farm will provide a plugin that will check your projects and warn you of some of these possible oversights as well as a few others (ours does!), but it’s never redundant to be absolutely sure that everything is in order before uploading a .blend, regardless of where you choose to render your projects. Just having to re-upload projects because of simple mistakes can take up more precious time than you’re comfortable with!
In summary, here’s a quick checklist you can refer to before uploading to a render farm:
A. Check that the Compositor output node has your final node chain connected to it
B. Check that the Render Region is or isn’t enabled, depending on your intentions
C. Check that Simplify is or isn’t enabled, depending on your intentions
D. Check your resolution settings - especially the percentage slider!
E. Check the Denoiser toggle in the render settings, and your node chain if you enabled the Denoise Filter render pass. We hope this was an entertaining and useful read, and that we see you on the farm someday. Stay vigilant, and as always, Happy Rendering!


