
Before we begin, here’s the TLDR if you’re in a rush:
Let us say you have completed designing your 3D project and are now ready to render the final output. Congratulations! The creation part is complete; you are very proud of your work. All that is left is the final pesky step of rendering.
You have decided to enlist the services of a cloud render farm because you want your client or audience--and not their grandchildren--to see your marvelous work. You are now on the hunt for a render farm to partner with and you want to compare prices.
You have decided to include GarageFarm.NET in your selection process. You visit our website and click on the Pricing tab. This is what greets you:
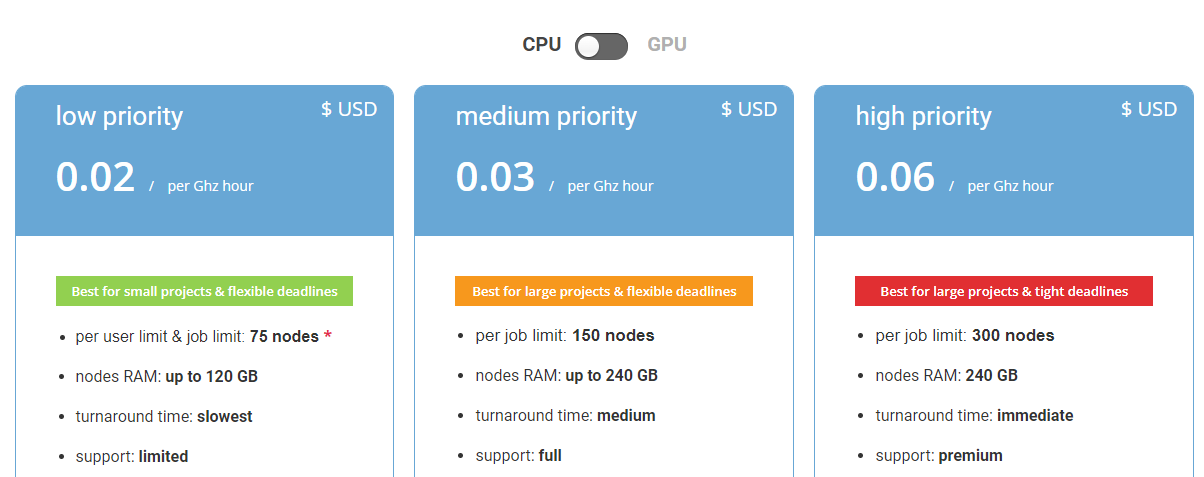
If your reaction upon seeing this table is “What the ---- did I just read?” then you have come to the right place. We are here to explain all of these to you right now and help you in your decision journey of finding the right render farm.
A render farm is like a massage therapist or a parking slot--it charges a fixed amount per every hour of use of the service. Ghz hour is a render farm’s way to quantify its service uniformly across the different types of processors it uses to render projects. As you already know, different processors have different processing speeds and different number of cores and with most render farms, you get to choose which processors you’d like to render your project. Ghz hour is a useful measurement to compare prices across these different processors.
If this is the first time you are encountering “per Ghz hour” and you find that this measurement isn’t intuitive to you right away, that’s okay. We’ll try to simplify it for you right now with a simple thought experiment: imagine a computer that has a single processor and this processor has a single core. Imagine further that this single-core processor runs exactly at 1 Ghz. Let’s say we render a project using this computer and it is completed in exactly 1 hour. In this scenario, we can say that the project took 1 Ghz-hour. Now, let’s say that a render farm using this computer charges $1 per Ghz hour, then the cost for the project described is exactly that: $1 per Ghz hour.
Of course, this scenario was only drawn up to illustrate the concept of Ghz hour and is not realistic at all. For one, processors now have multiple cores and run at speeds much greater than 1 Ghz. Also, $1 for 1 Ghz hour is way too much. This imaginary render farm is a slow and overpriced one.
Going back to the image of the GarageFarm’s pricing chart, you’ll notice a little switch on top. It simply switches you between the prices for CPU rendering and the prices for GPU rendering (for software that renders using GPU cards only like Octane and Redshift).
You’ll notice that switching from CPU to GPU changes the unit of measurement for the price from “per Ghz hour” to “per OB hour”:

Don’t be alarmed--OB simply stands for OctaneBench, which is an industry standard for measuring a GPU’s processing power. It is determined by letting a GPU run a process called benchmarking.
So again for simplicity’s sake, let’s assume that a render farm has a GPU that performs at 1 OctaneBench point per hour. If the render farm charges $1 per OB hour and your project took 1 hour to complete, then your final bill will be $1. If your project took 2 hours, then it’s $2. (Again, this example is completely hypothetical--in real life, 1 OB point per hour is way too slow and $1 per OB hour is way too overpriced.)
You are still on GarageFarm’s pricing tab. You scroll down the page and you are greeted by this:
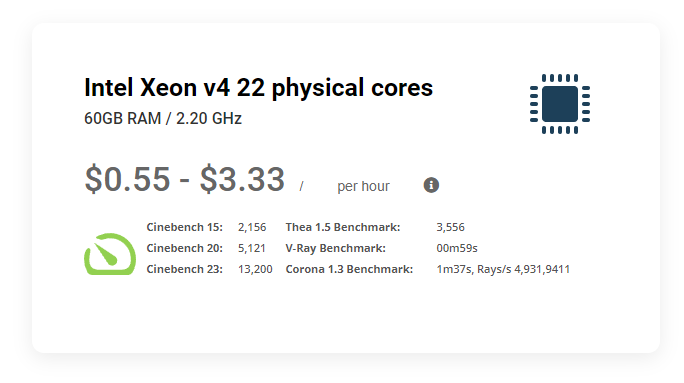
You ask yourself “How come this one just gives a cost per hour? What’s going on?” with slight frustration.
Take a breath and relax. We shall make sense of this together.
What you are looking at is the second way to compute the price of rendering services: the “per node hour” cost. But before we can go any further, we have to talk about what a node is.
The essence of a render farm is that it is simply a collection of powerful computers that you can use to render your 3D project faster via the cloud. A CPU or GPU that is part of this collection is called a node. A node can have multiple processors and cores. Same is true for a GPU node - it can have multiple graphics cards on board. The image below shows an example of detailed specifications of different nodes available on the farm. Make sure to check GarageFarm’s pricing page to see all types of nodes we offer.
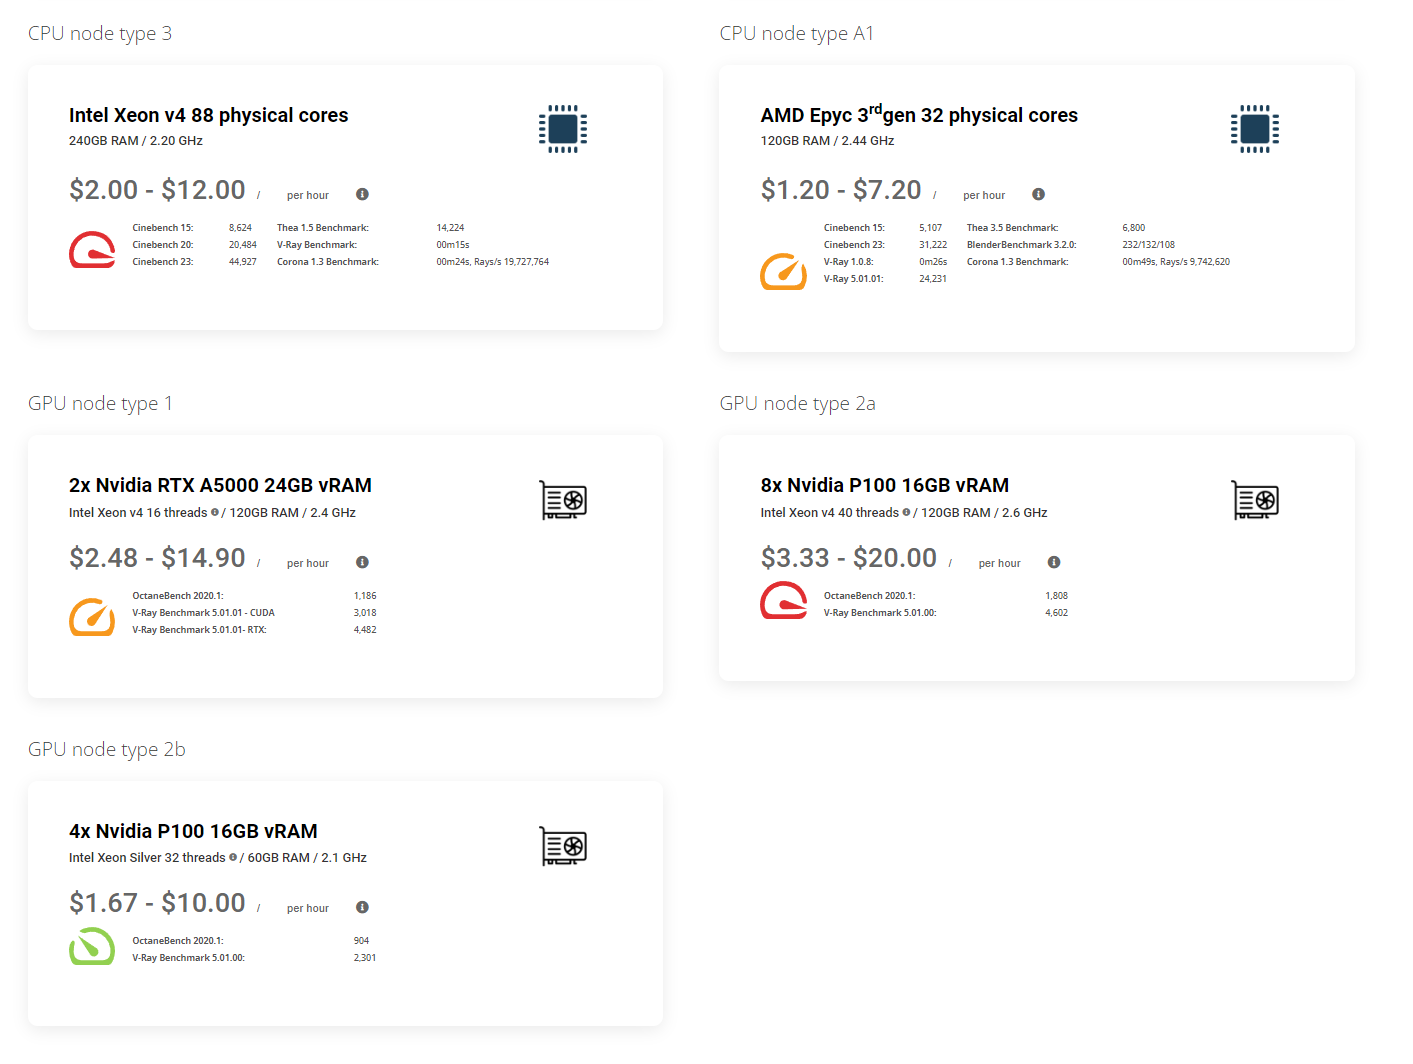
Now that you know what a node is, “per node hour” becomes simple: it is the cost of rendering per hour using a specific CPU node or GPU node. This is useful for when you want to choose for yourself the exact processor or video card that you want to render your project with. This becomes relevant when you are using software that is only compatible with or is optimized for a certain CPU or GPU.
Now that you have a handle on Ghz hour, OB hour and node hour, you scroll further down GarageFarm’s pricing page and you find the “Get Estimate” button. You are now ready to get a cost estimate for your project. You click it and you find this:
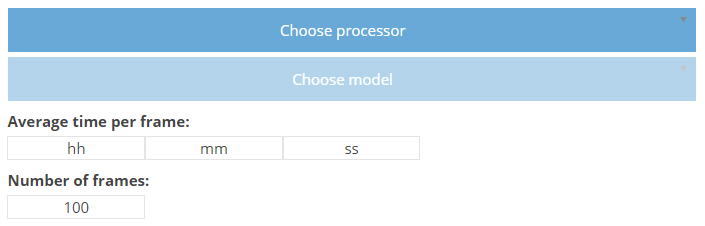
Before you can use this calculator, there’s a step you need to take. You need to find out first what your computer’s average render time per frame is. To do that, render a few frames from different parts of your project using your computer then average the render times.
Once you have that, this calculator becomes very straightforward: you choose your computer’s processor, choose the specific model, input your computer’s average render time per frame, then input your project’s total number of frames.
So for example: let’s say your laptop that runs on an Intel Core i5-4300U renders at an average of 12 minutes per frame. And let’s say your project has a total of 100 frames. You get this cost estimate:

Based on this calculator, rendering your 100-frame project with GarageFarm will only take 1 minute at the most! And depending on the farm priority that you choose, rendering your whole project at the farm will cost you as low as USD$1 or as much as USD$6. Great deal!
Again, it cannot be said enough that this is only an estimate. The calculator cannot take into account certain factors like how long your project takes to load, or if there are rendering issues like hanging buckets, or how long you wait in line before nodes become available to render your project.
On this last point is where priority plans come in. Notice that you get 3 cost results: one for Low Priority, one for Medium Priority, and one for High Priority. These priority options are there to offer you versatility depending on your situation. If a client is breathing down your neck and you need the final render ASAP, go for High Priority. Choosing High Priority puts you ahead of the farm’s render queue and gives you more nodes, minimizing waiting time. If you are rendering days ahead of your deadline and are not in a rush, you can opt for Low Priority and save some money.
Whichever priority plan you choose however does not affect render quality, only the time it takes to render your whole project.
So again, if the question is, “How much would rendering my project cost given the resolution and the effects and the complexity?” the simple answer boils down to render time per frame: the time it takes for a single frame of your project to be rendered.
Rendering is a complex process. Cloud rendering, even more so. Different software and hardware have their own quirks and these can surface randomly and affect your render, leading to longer render time and higher costs. Some common sources of issues are:
So how do you make sure that you don’t waste time and money when you render using a farm? You test.
Testing not only allows you to arrive at a better cost estimate, it also helps you filter out and avoid possible issues that may spring up. Better that those issues come out during a test of a few frames than when the meter is fully running on your project’s final render, right?
Here are some ways to do test render to effectively rule out potential issues:
This is a testing method that lets you test evenly across the whole range of your animation. For example: if you have a 100-frame project, you can render every 5th frame starting from the first frame (1st, then 6th, then 11th, and so on). Doing this gives you a reasonably representative sample from all parts of your animation sequence. If you average the cost across all your test frames and multiply it by the total number of frames (in this example, 100), you get a good estimate of the total cost. Then if you average the render times for all the test frames and multiply it by the total number of frames, you get the total render time for your project. Since render farms process your project using multiple nodes, you can even expect a lower total render time for your actual rendering run. For best results, we recommend a test size of at least 20 frames. If you have longer animations, it’s good to have more than that.
All render engines can generate artifacts, especially when the quality settings are set too low. So in order to determine how noise will be handled by the render farm, it’s good to run a flicker test of 5-20 consecutive frames. This is kind of the opposite of the step-test described above where you test non-consecutive frames. Rendering a test of consecutive frames gives you an opportunity to check if a potentially noisy section of your project animates well enough. This way, you can make adjustments before you commit to the full cost of the final render.
So far we’ve only discussed animation. When it comes to still images, the trick is to test a lower resolution version of the final image first. Let’s say you have an image that’s 2000 x 2000 pixels. You can run a test at 500p x 500 pixels first. Then based on the result, you can get an estimate for the final image by multiplying the test cost by 16 (4x4). For best results, we don’t recommend going lower than ¼ or ⅕ of the final resolution for tests.
As to the estimate for the final rendering time, it’s not as simple as multiplying the test time by the denominator of the test resolution. The reason for this is that there are factors in rendering stills that have nothing to do with resolution:
Another way for testing still images to get an estimate without changing resolution is to reduce sampling and/or number of passes, or increase noise level.
Now that you know about what goes into the prices at render farms and how to get good estimates via running tests, we hope we helped you to gain more confidence in using cloud rendering services. If you feel as though you’d like to delve deeper into testing techniques and learn ways to use cloud render farms efficiently, our 2-part how to use online render farms series might be right up your alley. Should you have specific questions or encounter some issues while actually rendering with us, that’s where our 24/7 support staff comes in. When you’re rendering with GarageFarm.NET, you don’t render alone.

.jpg)

