Log in to Web Manager (web dashboard) at https://app.garagefarm.net and download our renderBeamer app for your operating system.

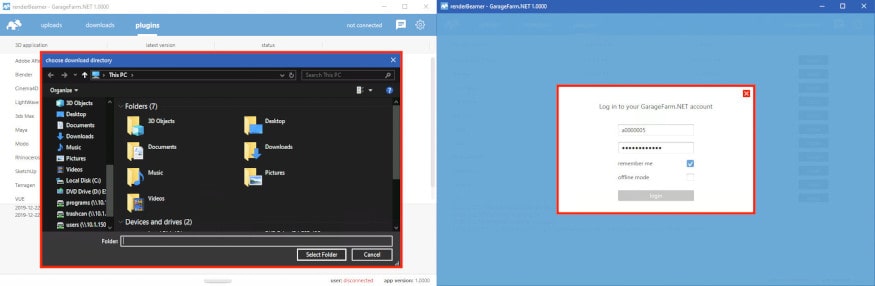
Install the renderBeamer app and start it. Once renderBeamer is done with the installation process, you need to choose the default download directory. This path will be used as the main output place for all your renders. Next, just log in using the account ID you received or your account email. Please keep in mind that the app should always be running in the background whenever uploading a project or downloading rendered frames.
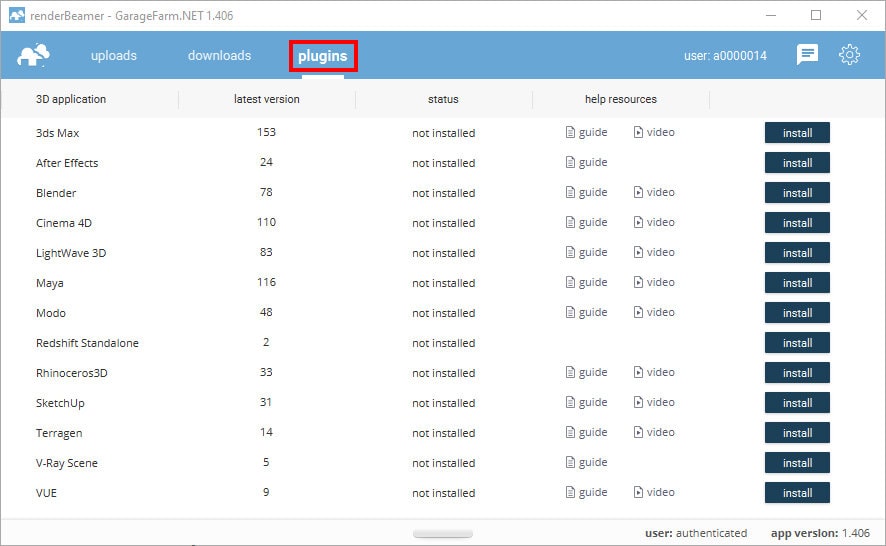
Once renderBeamer is installed and you’re logged in, you’ll see the Plugins panel. Plugins installation panel should automatically open after the first renderBeamer startup. You can also open it anytime you need to install additional plugins for your 3D apps.
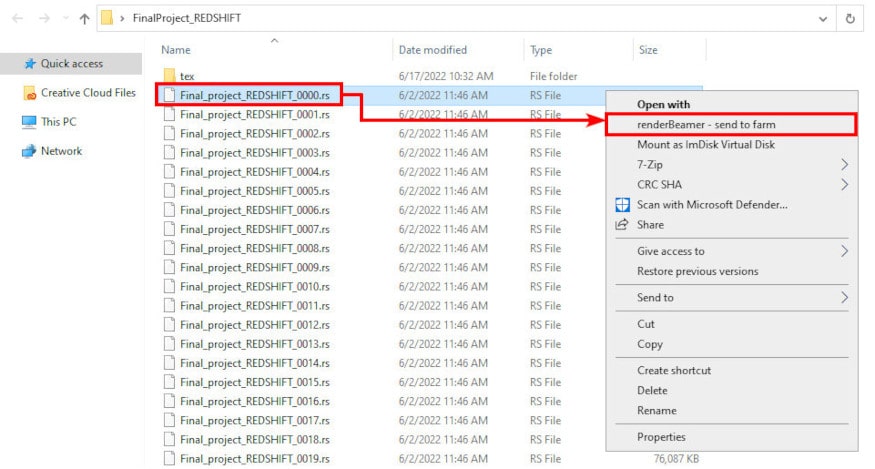
In your DCC app, open the scene and export it to the Redshift scene (.rs file).
When your DCC app is done with exporting the .rs sequence, you can use our plugin directly from your operating system’s file explorer. To do that just browse to the .rs file and right-mouse click on the scene file.
Once the plugin has started, you will see the main plugin panel. The plugin UI for Redshift Standalone is displayed in the setup tab in our renderBeamer app. Here you can check and change your settings before uploading your project to the render farm.
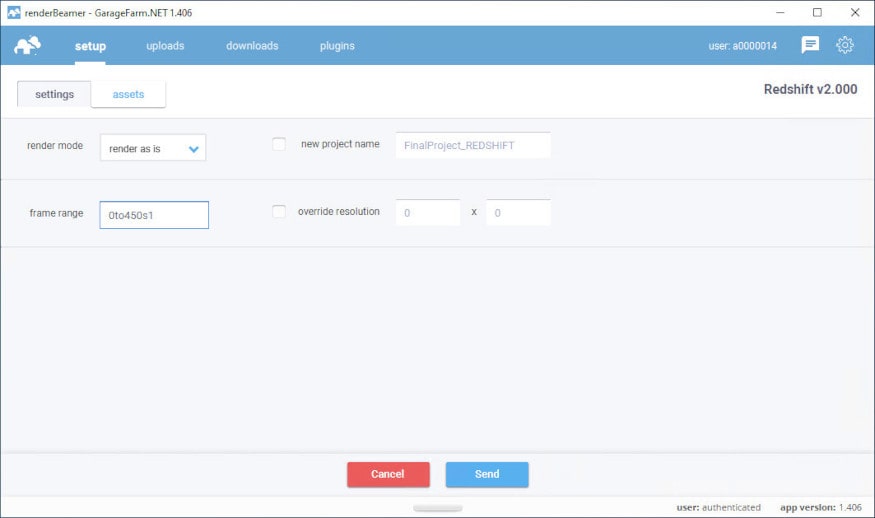
Settings tab
Our plugin automatically detects your settings that have been used in the DDC app render settings, however, you can always make changes here in the plugin before sending the scene to the farm.
Assets tab
Our Redshift Standalone plugin automatically checks scenes for missing assets, and if there are any, you can use our integrated asset tracker tool to relink or replace a given asset with a different version of the one you need.
To open the asset tracker, just click the “Assets” tab, then you can inspect all detected assets.
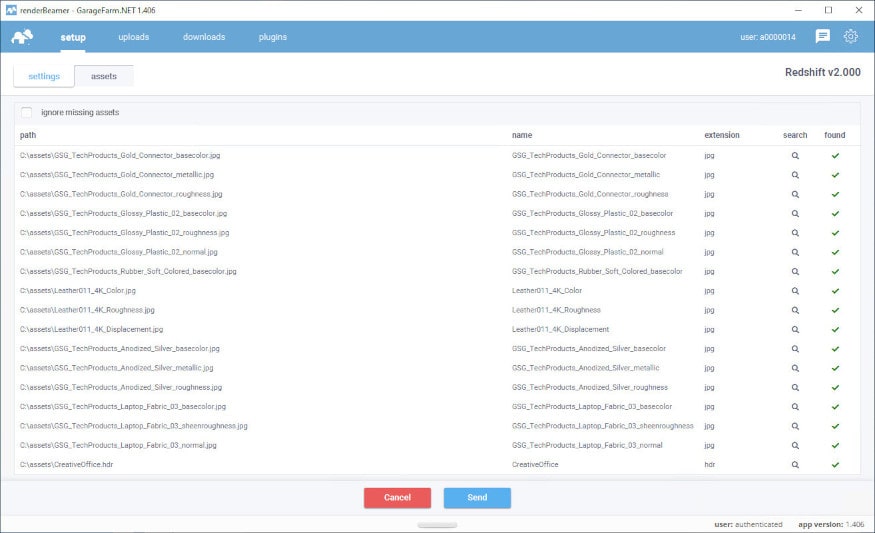
In the asset tracker panel, you can review your asset list. If assets paths and names are correct, all of them should have the green status with “found” info. Otherwise, you can point or relink missing assets by using the "search icon" and relink them one by one.
If there are paths to files in the assets tracker that are not required for proper rendering and you want to skip them, you need to tick the "ignore missing assets" option. This way, our plugin will not force you to select these files and it will not block the upload process.
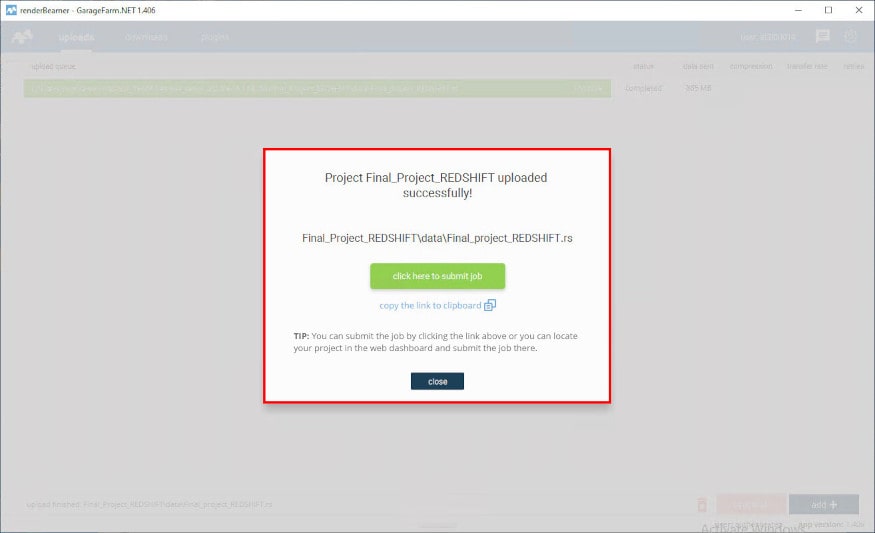
Once our plugin completes the scene export, your project will be redirected to renderBeamer to be uploaded. In a nutshell, renderBeamer is a standalone uploader/downloader application that works in conjunction with our plugins. Simply put, it takes care of the file transfers.
After the scene has been fully uploaded, the app will show you a window with a direct link to your scene on Web Manager (web dashboard). To continue use the click here to submit job button. If for some reason you closed the window with the link or it didn’t work, don’t worry, you can locate your project in the web dashboard and submit your scene by clicking on the scene file any time (more on that in the next step). You can also copy the link to clipboard and manually paste it into your web browser.
Now that your project is uploaded you will need to follow the final step - creating and submitting a job to render farm. Web Manager is a home to all your projects and render jobs.
If you followed the link generated earlier by renderBeamer, you will now see the job submission window with several fields and settings. If you didn’t follow the link or it didn’t work, you can do it manually by locating your project in the projects panel, finding the scene file within the project folder (in your folder structure look for the folder called “data”, i.e. Project_name/data/SceneName.rs), and clicking on it to open the job window.
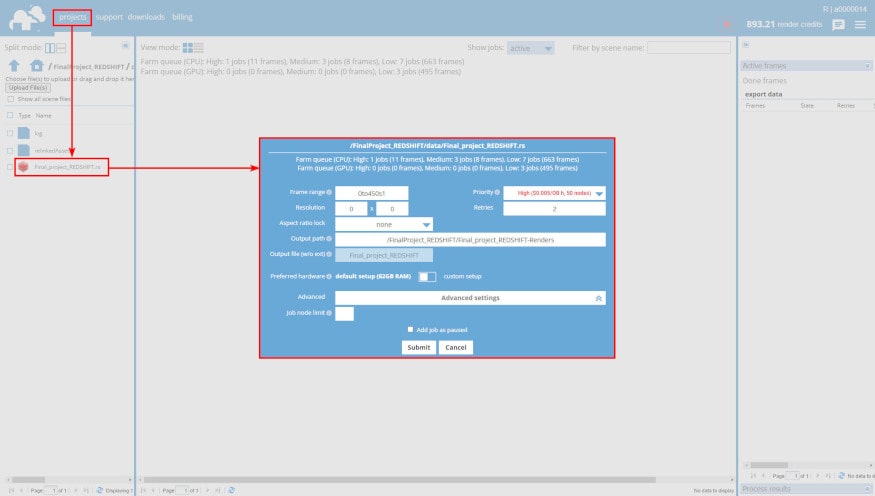
Our system automatically detects your settings in the scene and uses them to render the job. Before submitting the job to the render queue, please make sure that everything is correct and make adjustments if necessary.
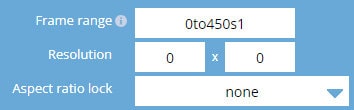
Frame range - use this field to put in the frame range you want to render. Frame range example for animations: 1to780s1 - this is a sequence of 780 frames in total and all the frames 1 to 780 will be rendered. The parameter "s1" means that every subsequent frame in the given range will be rendered. If you want to do a test first, set a higher s value, e.g. "s20", which will result in every twentieth frame in the animation range to be rendered. So if you set the range to 1to780s20, then the frames 1,21,41,61,81,101,...,741,761 will be rendered.
If you only want to render a single frame (still image), you should input a single frame number into the field. For example, 1 will render the frame number 1.
Resolution - here you can set the output resolution in pixels.
Aspect ratio lock - if you need to change the resolution and want to keep a certain aspect ratio, you can use one of the available presets: 4:3; 16:9; 16:10; 21 9; 1:1. Leaving the option as "none" means that you are free to modify the values for the "Resolution" ignoring the aspect ratio.

Output path - here you can find the default save path for rendered frames in the given job. The default output path is based on the name of your project and scene. You can edit this path if you clone your job and need to render a different range in that project.
Output file (w/o ext) - by default, the frames file name is set based on the name of your scene. If you want to create a unique name and/or you need to customize naming for the output according to your pipeline, you can set your own name for the output file.
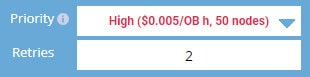
Priority - before adding a job to the render queue, you can decide how you want to prioritize it. Depending on the queue and farm traffic, a higher priority may allow your job to quickly acquire nodes to render your project faster. Each priority has a different rate and gives you a different number of nodes - a detailed list can be found here: https://garagefarm.net/pricing.
Retries - the value for this option is set to 2 by default. This means that if a rendering process fails or the software crashes, our system will perform two additional rendering attempts. We recommend leaving this option set to default (value 2) as this is the optimal setting to retry rendering in the case of some random 3rd party software errors.

Preferred hardware (node groups) - by default, the system sets the preferred hardware to nodes with 62GB RAM. As we render a .rs exported project on a GPU device, you can switch the node group button to a custom setup and select the particular group of nodes either based on the GPU model or RAM:

The full technical specification of nodes can be found here: https://garagefarm.net/pricing#specs.

Advanced settings

Job node limit - by default, the value for this option is empty, so the nodes are assigned automatically depending on the job priority and nodes availability on the farm. Nevertheless, if you want to limit the number of nodes for the given job, please put here the value of the maximum number of nodes you want to be used during rendering.
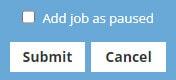
Add job as paused - if you tick this option and then submit your job, it will be added with the status “paused”. This means that it will not start rendering automatically. It is useful to use this option if you intend to add the job to the queue but do not intend to render it at the moment. After adding a "paused" job, you can resume it at any time by selecting the "resume job" option (right-click on the job).
Submit - when you press this button, the system will immediately add the job to the render queue. Please remember to check all settings before submitting a job!
Cancel - if you do not want to add the current job to the render queue or you want to reset your settings and add the scene again, you can use this option. The submission window with the settings for the given job will be closed, and all changes will be cancelled.
After giving your render settings a final check and choosing your preferred priority, hit Submit to add your job to the render queue. If you’re a first-time user, you will have received $25 worth of credit to test out our service. The credits should be enough to run a few test jobs and familiarize you with the service.
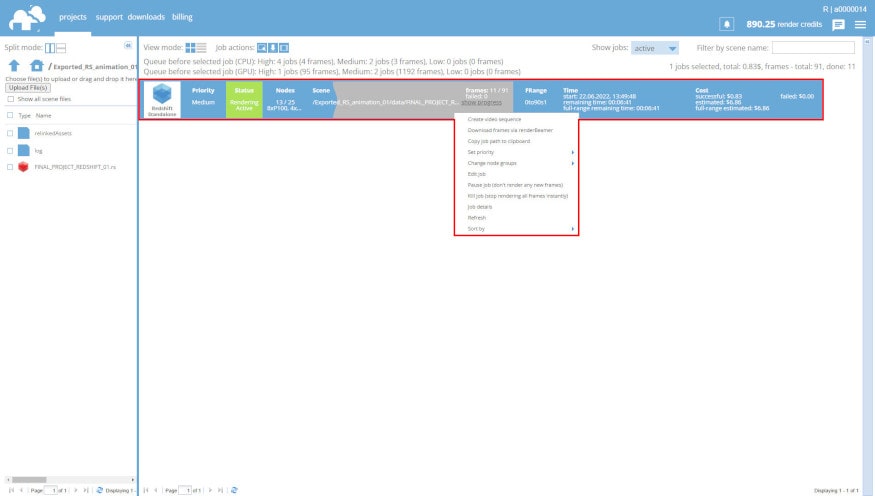
When the job has started rendering, you can check the real-time progress of currently processed frames. To do that, just select the render job from the main project list and then click the arrow on the top right side to open the progress panel.
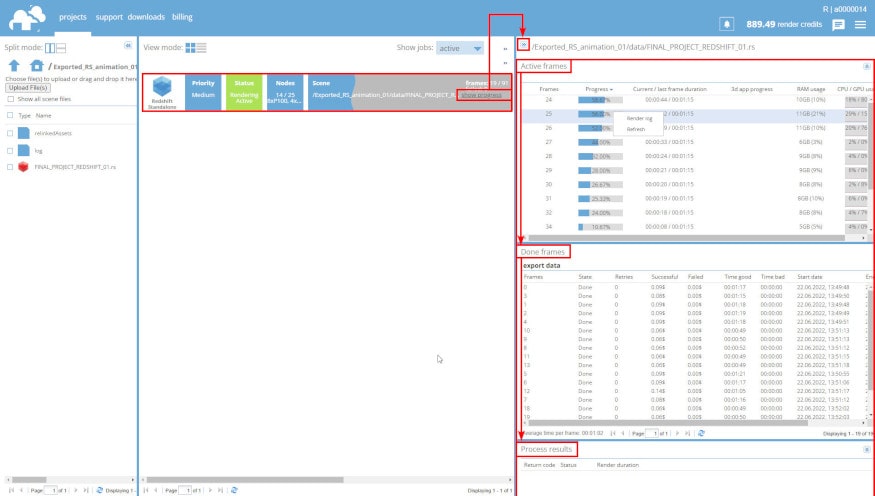
The Progress Panel (the panel on the right side of the screen) will show its content only when any of the jobs is selected. The panel is divided into 3 sections.
Active frames - it shows currently rendering frames. When a frame finishes, it is moved to the second section, Done frames. If you select any frame in the Done frames list, you can then access the render output process log in the bottom section called Process results.
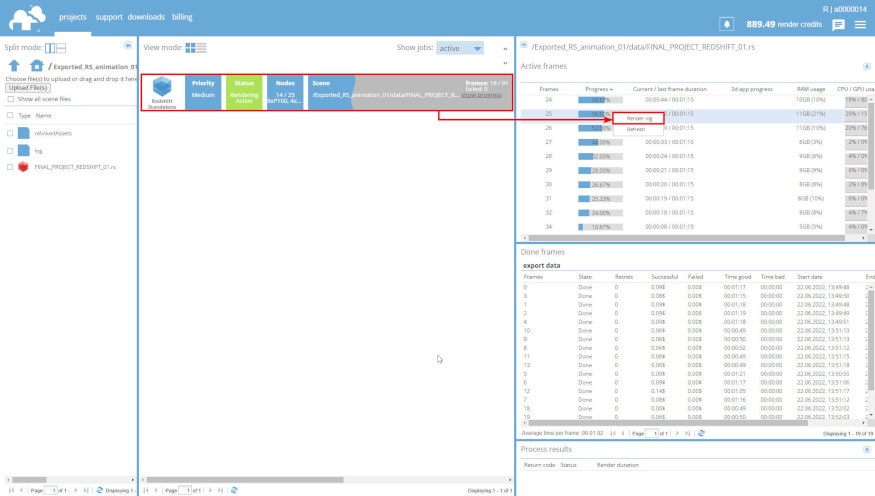
Each frame that has completed rendering is downloaded automatically to your local drive to a directory you selected in the renderBeamer application. If you’re not sure where your download folder is located, you can double check it or change it in renderBeamer’s settings (click on the cogwheel). Also, make sure you have auto download turned on to get the frames downloaded as soon as they are available. If this box is unchecked, you will have to click on each job in Beamer's "downloads" tab, and manually download the frames.

If you prefer more control over what to download and when, you can also download your frames manually. To do that, just turn off auto download switch in renderBeamer settings and go to the “downloads” tab. Next, select the desired render output using a checkbox, and click the download button.

This kind of workflow will download all rendered frames for the selected job or jobs. However, renderBeamer also gives you an option to download individual frames. To do that, you need to use the list files function under RMB.
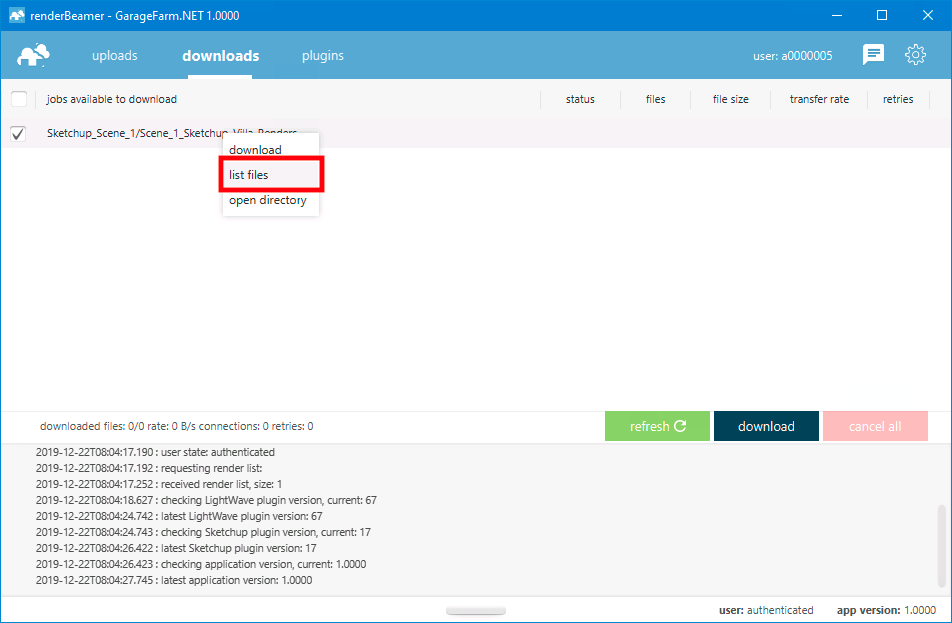
Once files for the selected job are listed, just roll down the list and select the files you’d like to download using checkboxes. Next, use the same download button.

Once your frames are downloaded, you can use open directory option under RMB to open the folder where frames are saved.
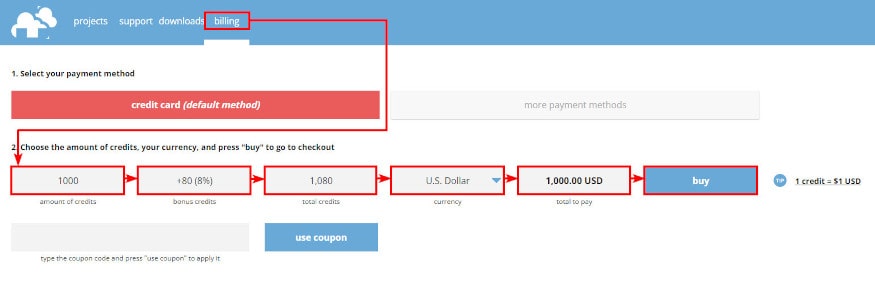
When you use up all your trial credits, you’ll need to charge your account to continue using the service. Please note that when your balance goes below $0, you won’t be able to download rendered frames or start new render jobs. You can make payments in the Billing panel in Web Manager. We accept debit cards, credit cards, PayPal and DotPay payments. Also you can purchase credits via Revolut or Zen.
If your rendering needs are high or you plan to render regularly, please make sure to check out our volume discounts.
You can talk to the GarageFarm.NET’s tech team any time of the day, any day of the week. We’re here to help you get started, answer your questions, and assist you in any way. Don’t hesitate to give us a shout.
You can contact us through our live chat accessible in the web dashboard or our desktop app when you log in to your account or message us here through the guest chat.
We also recommend checking out our FAQ page which answers most of the questions new users have.
.png)
